Is your kid’s electric ride on car not charging? Well, these toys tend to stop charging when they’re not well maintained.
Unfortunately, most parents don’t know how to troubleshoot this toy vehicle and always assume that the battery is dead when it’s not charging, which is not always the case.
So, before purchasing a new battery, please read on and find out how to troubleshoot this toy and the possible causes of the problem.
Table of Contents
The Main Reasons Why Your Electric Ride on Car Is Not Charging
A damaged battery is not the only thing that can prevent your kid’s toy car from charging, and knowing the leading causes of this problem can help you repair the car.
Finding out the cause of the issue can also save you some cash in the long run, so before you purchase a new charger or a battery, you should troubleshoot this toy. Some of the main reasons why your electric ride on car isn’t charging include:
Old Battery
Electric ride-on cars have reliable batteries designed to serve you for over 2 years; in fact, most brands have a lifespan of about 24 months. But for them to serve you for 2 years without ever breaking down, there are lots of dos and don’ts you have to adhere to.
Following these instructions can help increase the battery’s lifespan, so if your kid’s electric ride-on car’s battery is over 2 years old and isn’t charging, then it’s time to replace it. After all, these batteries tend to degrade with time.
Damaged Battery
A number of things can affect the toy vehicle’s battery, and one of the main ones is not following the instructions that come with the electric car.
For example, if the manual advises you to charge the batteries regularly even when not using the electric ride-on car, then you should.
This is because; batteries lose charge slowly when not being used. If left without charge for too long, it can result in failure or loss of capacity.
Batteries are sensitive to temperature and humidity; therefore, the user manual will instruct you to store the toy in a cool and dry environment. Storing the toy in the garage or shed can result in the battery getting damaged by the fluctuating or low temperature.
Corroded Connectors
As aforementioned, batteries are very sensitive to humidity; therefore, exposing them to high humidity or moisture can corrode the connectors.
Fortunately, cleaning the connectors can help restore its surfaces. If the cells are also damaged, then cleaning it cannot salvage the battery.
The Battery Might Be Flat
Some heavy-duty batteries aren’t designed to be used until they are fully discharged. Therefore, it’s crucial that you charge it regularly and never let it fully discharge. After all, if it’s fully discharged, then it cannot be charged.
This problem is caused by running the car for a long time until its battery is not powerful enough to run the motors, and then left on until the battery flats out.
Therefore, driving the car even after the motor starts losing power can be detrimental to your electric ride on the car’s battery.
Recharging some high-duty batteries after they have gone flat is impossible. So make sure you tell your children to never use their electric ride on cars until the battery flats out.
Other Reasons Why It’s Not Charging
Other causes of this problem are a loose wire in the toy car’s electrical system and a defective charger.
A faulty charger cannot charge the toy car, and if the wires connecting the battery to the charging system are loose, then recharging the battery can be pretty challenging.
Therefore, troubleshooting the toy is mandatory if you plan to find out the cause of the problem and solve it.
How to Troubleshoot an Electric Ride on a Car That Isn’t Charging?
Troubleshooting this battery-powered toy can help you find the source of the problem. For this DIY project, you need some simple tools like a basic multimeter and a screwdriver set. To troubleshoot this toy, you should do the following:
Step 1: Confirm if the Charger Is Working
Start by checking if the charger is functioning correctly using a multimeter. Plug in the charger to the mains and switch it on. And then confirm if the charger is transmitting 9V using a multimeter.
If the electric ride-on car’s charger is functioning properly, then the issue is in the car.
Some chargers tend to overheat when charging the ride-on toy car, so this shouldn’t worry you, especially if your charger is still functioning. But, if it’s overheating and still not charging, there is a problem with the charger.
Remember, just because the charger is not working, it doesn’t necessarily mean that the toy’s charging system and batteries are ok.
So you can get a new charger and confirm if it’s still working. And if it’s not charging, then you can proceed to the second step of troubleshooting the electric ride-on car.
Step 2: Check if the Wires Are Connected Properly to the Car’s Battery
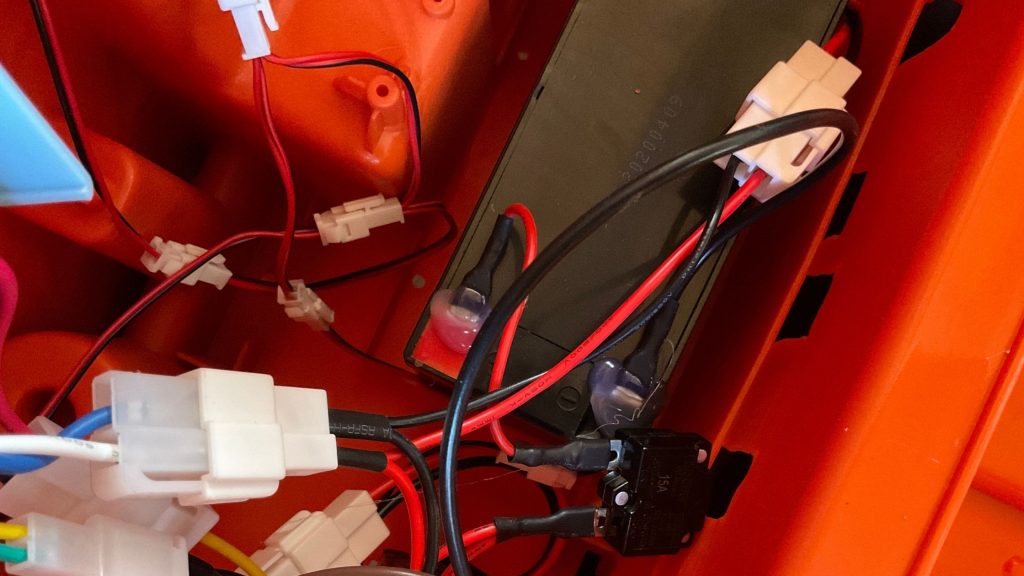
The circuit flow of an electric ride-on car is made up of numerous components that are linked by wires from the charging port.
When charging, the 9V is sent via the charger to the controller printed circuit board before reaching the batteries. If any of these wires are loose, then your car’s battery might not charge properly.
Therefore, if the charger is working properly, then you should proceed to the battery and confirm if the wires are tightly soldered to the PCB and the battery connectors.
If some of the wires are loose, you should fix them and then charge the toy car for a few minutes and confirm if the issue has been resolved.
Step 3: Confirm the Continuity of the Wires Connecting the Battery to the Printed Circuit Board
If it’s not charging, you should confirm these wires’ continuity from the battery to the printed circuit board using a multimeter.
With a broken current flow path the battery won’t charge. Make sure you replace all the wires that have been damaged.
Step 4: Confirm if the Connectors Are Corroded
The battery’s connectors tend to rust when exposed to humidity or moisture.
So if you store the car in the garage or a place with high moisture levels, you should confirm if the connectors are corroded. After all, the rust can prevent the battery from charging properly when being charged.
Step 5: Confirm if the Battery Is Charging
Normally, the voltage across the batteries when charging should be about 7V. So you should connect the toy car to the charger and confirm if the voltage is 7V. If it’s not 7V, then the battery isn’t charging, and the issue might be in the Printed circuit board.
Charge the battery for a while and then measure the voltage. If the charge will be less than 5.8V, then the battery has been damaged, and you need to replace it.
How to Repair an Electric Ride-on Car That Isn’t Charging
Replace the Battery
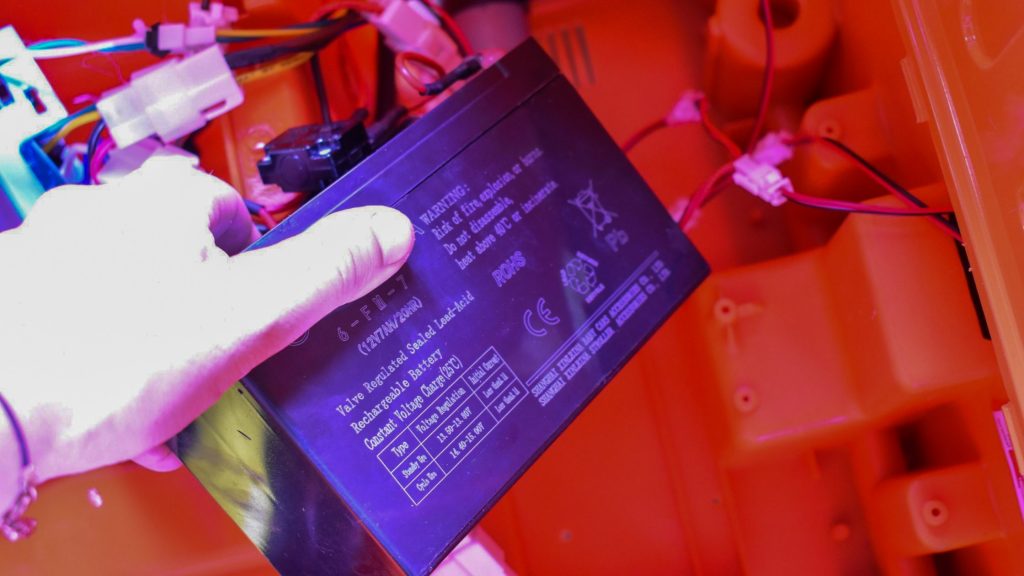
If the charger is working perfectly, the connectors are not corroded, the wires are not loose, and the car isn’t charging, the battery is the problem.
If the battery doesn’t work even after cleaning the corroded connectors, then it’s time to replace the battery. If the toy vehicle’s battery has exceeded its lifespan, then you need to replace it; after all, this might be another reason why it’s not charging.
Luckily, replacing the battery is a simple maintenance task that anyone parent can easily perform. But it’s crucial that you purchase the right replacement battery for your ride-on car model.
Check the battery’s dimensions and make sure it fits in the toy’s battery compartment.
Some models come with switches and connectors. And if your battery needs some connectors and switches, make sure you get the right extra accessories for the replacement process.
Try and charge the replacement battery for the right amount of time before installing it in your toy vehicle’s battery compartment.
The replacement process is quite straightforward; all you have to do is remove the damaged battery and store it in a safe place. And then put the new battery in the toy’s battery compartment and connect its terminals.
Attach the black wires to the black terminal and the red wire to the red terminal before starting the electric toy car to see if it’s well-connected and everything is working.
Once it’s properly installed, you can connect the electric ride-on car to the mains and charge the battery until it’s full.
Other Solutions
If the charger isn’t working properly, you should replace it, but make sure you get the right option for your toy car model. After all, getting the wrong charger can result in the battery’s cell getting damaged.
If the battery’s connectors are corroded, then you can remove the rust and then clean the connectors, and you are good to go. But if it’s a case of major corrosion, you may have to replace the battery connectors.
Conclusion
There are numerous reasons why your kid’s electric ride-on vehicle isn’t charging. And while a damaged battery is the leading cause of this problem, there are other minor and less costly things that can affect the charging system.
Therefore, before you rush to the store and get a new battery, you should troubleshoot the toy and find out the real cause of the problem. After all, buying a new charger or cleaning the corroded battery connectors is way cheaper than purchasing a new battery.


